Ten Day Launches: Pixel + CAPI Creators Can Trust
Ten Day Launches: Pixel + CAPI Creators Can Trust

For reliable ad measurement in 2026, install a browser pixel, enable Conversions API, and verify every event before you spend real budget. Add the base pixel to every page, turn on server-side events with deduplication tied to a shared event_id, then confirm PageView, AddToCart, and Purchase all fire cleanly using Meta’s own diagnostic tools. Build in a consent check so tracking only fires where you’ve collected permission.
TL;DR:
- Installing both a browser pixel and Conversions API with deduplication tied to event IDs recovers missed conversions and enhances event matching quality.
- Using partner integrations or Google Tag Manager simplifies setup, but legacy snippets and duplicate codes often cause inflated event counts, so thorough testing is crucial.
- Prioritizing standard events like PageView, ViewContent, AddToCart, InitiateCheckout, and Purchase with complete parameters ensures accurate tracking and algorithm optimization.
- Verifying event firing and deduplication through tools like Pixel Helper and Test Events is essential to identify issues before ad campaigns go live.
- Ensuring consent-based tracking and hashed identifiers in server events maintains compliance and improves data match quality for attribution.
Table of Contents
- What Is Pixel Tracking, and Why Does Pixel + CAPI Matter?
- Prerequisites and Planning Before You Touch Any Code
- How Do You Install the Base Pixel? Partner, GTM, and Manual Methods
- Which Standard Events Should You Set Up First?
- How Do You Set Up Conversions API and Fix Duplicate Events?
- How Do You Verify Everything Fired Correctly?
- Common Pixel Problems and How to Fix Them Fast
- Staying Compliant: Privacy and Consent Basics
- Your Pre-Launch Pixel Checklist
- Money Plug Lab: Launch-Tested Tracking Tips for Creators
- The Fastest Path to Reliable Tracking
- Let Money-plug Handle Your Pixel and Launch Tracking
- Sources
What Is Pixel Tracking, and Why Does Pixel + CAPI Matter?
A tracking pixel is a small piece of JavaScript (or, historically, a 1x1 transparent image) that fires when someone loads a page or takes an action on your site. It reports that event back to an ad platform so the platform’s algorithm can attribute a sale, a lead, or a page view to a specific ad. That’s the entire job: watch, report, feed the algorithm.
Client-side pixels run in the visitor’s browser, which is exactly their weakness. Ad blockers strip them out. Safari’s Intelligent Tracking Prevention limits how long cookies survive. Consent banners block them until a visitor clicks “accept.” A meaningful share of real conversions simply never reach Meta or Google because the browser never let the request out.
Server-side tracking through the Conversions API sends the same event data directly from your server to the ad platform, bypassing the browser entirely. Meta’s own guidance treats this pairing, not the pixel alone, as the baseline for accurate 2026 measurement. Running both together does two things a lone pixel can’t:
- Recovers conversions the browser pixel missed due to blockers or expired cookies
- Improves Event Match Quality, since the server sends stable identifiers the browser can’t always guarantee
Think of the pixel as your fast, front-line reporter and CAPI as the backup camera that catches what the reporter missed.
Prerequisites and Planning Before You Touch Any Code
Rushing installation without a plan is how teams end up with three overlapping pixels and no idea which one is telling the truth. Work through these steps first.
- Confirm Business Manager and Events Manager access. You need admin or advertiser-level permission on the ad account, plus a Meta Pixel or dataset already created in Events Manager. If someone else owns the account, get added before you start.
- Get CMS and tag manager access lined up. Know whether your site runs on Shopify, WooCommerce, WordPress, or a custom build, and confirm you (or a developer) can edit the theme’s head section or publish changes in Google Tag Manager.
- Have a developer contact on standby. Even a “simple” install occasionally needs someone who can read the site’s template files, especially on custom-built platforms.
- Define your event taxonomy before you write a line of code. Decide which standard events you’re tracking, what you’ll name any custom events, and which parameters (value, currency, content IDs) each one needs to pass.
- Settle your consent approach up front. Decide how cookie consent will gate tracking, particularly if you serve visitors in regions with strict data laws. HubSpot’s own setup documentation flags this explicitly, noting that some US state privacy laws limit how ad-network data can be used once collected.
Skipping step four is the single most common reason accounts end up tracking five almost-identical “purchase” events with no consistent naming. Fix the taxonomy on paper first.
How Do You Install the Base Pixel? Partner, GTM, and Manual Methods
You have three real options for getting the base pixel onto your site, and the right one depends on your platform and your comfort with code.
Partner integration is the fastest and generally the safest path if your platform supports it. Shopify, WooCommerce, and similar platforms offer built-in connections to Events Manager. You log in, connect your ad account, pick your pixel, and the platform handles placement and often enables server-side events as well. Shopify’s own documentation walks through connecting Facebook sales channel data directly to your pixel and lets you choose the data-sharing level, from standard events only up to enhanced matching with customer information.
Google Tag Manager gives you more control without touching your site’s core code every time you need a change. The process:
- Create a Custom HTML tag inside GTM and paste your pixel’s base code into it.
- Set the trigger to “All Pages” so PageView fires everywhere, including pages you add later.
- Use GTM’s Preview mode before publishing. This opens a debug console showing exactly which tags fired on a given page load, which catches misfires before they hit live traffic.
- Publish only after Preview confirms clean firing on your homepage, a product page, and your checkout or thank-you page.
Manual installation means pasting the base pixel code directly into your site’s header template, then adding individual event calls (AddToCart, Purchase, and so on) on the specific pages where those actions happen. This works fine for simple, static sites, but it’s the method most likely to produce stale code, since every future change requires another developer touch.
Whichever method you choose, check for legacy snippets before you finish. Old pixel code from a previous agency, a former employee, or an abandoned plugin often survives quietly in a theme file, firing the same PageView event twice on every load. That single leftover snippet is the most common cause of inflated event counts, and it’s invisible until you go looking for it.
Pro Tip: Search your site’s full page source (not just the visible theme editor) for the string “fbq(” before you install anything new. If it returns a hit and you didn’t put it there, you’ve found your duplicate before it becomes a headache.
Which Standard Events Should You Set Up First?
Not every event deserves equal attention on day one. Prioritize the events that map directly to revenue and lead generation, since these feed the algorithm’s optimization decisions.
- PageView — the foundation event; confirms the pixel loaded at all.
- ViewContent — fires on product or offer pages; useful for retargeting audiences.
- AddToCart — signals purchase intent and feeds funnel-stage optimization.
- InitiateCheckout — marks the step just before payment; critical for identifying drop-off.
- Purchase — the event that matters most for e-commerce; this is what most ad accounts optimize toward.
- Lead — the equivalent priority event for coaching offers, waitlists, or gated content.
Each event needs parameters attached, not just a bare fire. Purchase and InitiateCheckout should always pass value, currency, and content_ids at minimum. These parameters let the platform match a specific transaction to a specific ad and improve future targeting based on transaction size, not just a binary “did it happen.”
Implementation runs through two main paths. In GTM, you typically pull these values from the page’s dataLayer, which your developer populates with variables like transaction_id or product_price at checkout. For simpler sites, an inline snippet placed directly on the confirmation page can pass the same values as hardcoded or template-pulled parameters. Meta’s own Event Setup Tool in Events Manager lets you click page elements to map them to parameters without writing code, which works well for straightforward button clicks but less well for dynamic checkout values.
Reach for a custom event only when a standard event genuinely doesn’t fit your funnel, like tracking a webinar registration or a quiz completion. Overusing custom events when a standard one applies weakens your data because the algorithm treats standard events with more built-in optimization support.
Whichever method you pick, check during verification that every required parameter actually arrives with the event, not just that the event fired. A Purchase event with no value attached is barely more useful than no Purchase event at all.
How Do You Set Up Conversions API and Fix Duplicate Events?
Once your browser pixel is stable, Conversions API is what closes the gap on conversions the browser alone misses. You have three implementation routes, in order of ease:
- Native partner integration. If your platform (Shopify, WooCommerce, and similar) supports it, this is the fastest path. Enabling CAPI often takes a single toggle once your pixel is already connected, since the platform’s servers already have the transaction data.
- Server-side Google Tag Manager. This gives you a middle ground, letting you route events through a server container you control without writing raw API calls. It suits teams with a developer but no desire to maintain custom backend code long-term.
- Direct API calls. Your server sends events straight to Meta’s endpoint using your own code. This gives full control but needs ongoing developer maintenance, including token rotation and error monitoring.
Whichever route you choose, deduplication is the step that separates a working CAPI setup from one that’s silently doubling your reported conversions. The fix: send the same event_id, typically your order or transaction ID, from both the browser pixel and the server-side CAPI event for that same action. Meta’s matching system recognizes the shared ID and counts it once, not twice.
Timing matters here too. Server events sent with a significant delay after the matching browser event can create attribution gaps, since the platform’s real-time matching window is limited. Fire your CAPI event as close to real-time as your infrastructure allows.
Event Match Quality improves further when your server sends hashed customer data, hashed email, phone, and name, alongside the standard event, while your client-side pixel supplies the FBP and FBC cookie values used for click attribution matching.
Pro Tip: If your EMQ score sits noticeably below what similar accounts report, check first whether your server events are missing hashed email or phone. That single gap is the most common EMQ killer, and it’s usually a two-line fix once you spot it.
Watch your server logs for silent failures, expired access tokens, wrong endpoint URLs, and timestamp mismatches. These are the three most common CAPI pitfalls, and none of them throw an obvious error on your website itself.
How Do You Verify Everything Fired Correctly?
Verification isn’t optional, and it isn’t a one-time task either. Run this check every time you touch pixel code, launch a new landing page, or change your CMS theme.
Start with Meta Pixel Helper, the browser extension that shows every pixel firing on the current page in real time. It flags whether your Pixel ID matches what’s registered in Events Manager, a mismatch that happens more often than you’d expect when code gets copied from an old campaign or a template.
Move next into Events Manager’s Test Events tool. This shows events arriving in near real-time, from both your browser pixel and your server-side CAPI, and lets you inspect exactly which parameters came through with each one. Confirm that value, currency, and content_ids are present on Purchase and InitiateCheckout, not just that the event name shows up.
Then confirm deduplication is actually working. If a Purchase event appears twice in Test Events with the same event_id, one from browser, one from server, Events Manager should show them merged into a single deduplicated event, not counted separately.
- Check Pixel Helper on your three highest-traffic page types (home, product, checkout confirmation)
- Trigger a real test transaction and watch it land in Test Events within seconds
- Confirm every required parameter shows a real value, not blank or null
- Verify the browser and server versions of the same purchase merge into one event
Event Match Quality shows up as a diagnostic score inside Events Manager, and it’s worth checking on every account, since a low score directly limits how well the algorithm can optimize toward your actual buyers. There’s no single universal “good” number since it varies by event volume and data richness, but a score that trends downward after a site change is your signal to recheck hashed parameters and cookie values.
Common Pixel Problems and How to Fix Them Fast
Most pixel failures fall into four categories, and you can usually diagnose them without pulling in a developer.
Pixel not detected at all. Open Pixel Helper on the page in question. If it shows nothing, check that the base code sits in the page’s head section (not buried in a footer script that loads after the page finishes rendering) and confirm you didn’t accidentally paste a test or sandbox pixel ID instead of your live one.
Duplicate events inflating your numbers. This almost always traces back to one of two causes: a legacy snippet left over from a previous install, or a partner integration and a manual install running side by side. Search your site source for multiple instances of your pixel ID, and if you find a server-side CAPI event alongside the browser event, confirm they share the same event_id so Events Manager can merge them instead of counting both.
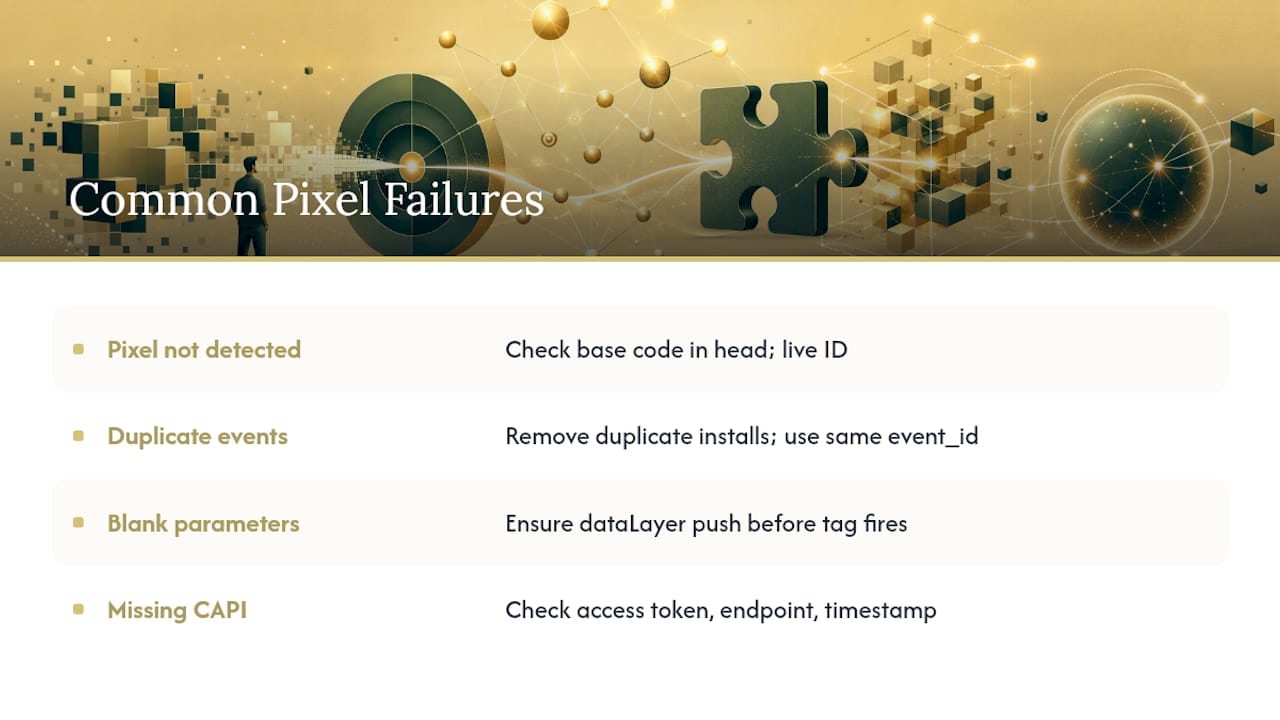
Parameters showing up blank. Usually a dataLayer problem. If GTM is pulling value or content_ids from a variable that isn’t populated at the moment the tag fires, the event goes out empty. Check that your dataLayer push happens before the tag trigger, not after.
CAPI events not arriving. Check your access token hasn’t expired, confirm the endpoint URL matches your pixel’s actual dataset ID, and look for timestamp mismatches in your server logs. Server events sent with a timestamp too far in the past get rejected or attributed incorrectly.
Staying Compliant: Privacy and Consent Basics
Block non-essential tracking pixels until a visitor actively consents, wherever local rules require it. Integrate your consent management platform’s state directly into GTM so tags stay dormant until permission is granted, rather than firing first and hoping no one notices.
On the server side, send hashed identifiers, never raw email addresses, phone numbers, or names, and avoid storing personally identifiable information longer than your stated retention policy allows. Document exactly what you track and why in your published privacy policy; regulators and platforms both expect this to match your actual implementation, not a generic template.
Rules differ meaningfully by region and by visitor category, and HubSpot’s own installation guidance flags state-level US privacy restrictions on ad-network data use as one example of a rule that varies by jurisdiction. When you’re uncertain how a specific law applies to your setup, that’s a conversation for legal counsel, not a guess based on a blog post.
Your Pre-Launch Pixel Checklist
Run through this list before you send a single dollar of ad spend to a new tracking setup.
- Pixel ID created in Events Manager and confirmed to match the code on your live site
- Base pixel installed site-wide, with PageView firing on every page type
- Standard events (ViewContent, AddToCart, InitiateCheckout, Purchase, Lead) firing with full parameters
- dataLayer populated correctly before any GTM tag that depends on it fires
- CAPI enabled and sending events with a shared event_id for deduplication
- Test Events confirms browser and server events merging, not duplicating
- Pixel Helper shows no errors and no mismatched Pixel ID
- EMQ score checked and hashed parameters confirmed present
- Consent flow integrated so tracking respects visitor choice
- Legacy or duplicate pixel snippets searched for and removed
| Checklist Item | Tool to Verify | Pass Condition |
|---|---|---|
| Base pixel installed | Pixel Helper | Correct Pixel ID detected on every page type |
| Standard events firing | Test Events | Event name and parameters appear in real time |
| Deduplication working | Events Manager | Browser and server events merge into one |
| Consent integration | GTM Preview | Tags stay blocked until consent granted |
Money Plug Lab: Launch-Tested Tracking Tips for Creators
Running paid traffic into a ten-day launch window leaves no room for a tracking blind spot to surface on day six. Across multiple launches, Purchase and Lead events with complete value and content_id parameters consistently drove the sharpest gains in return on ad spend, since the algorithm can’t optimize toward buyers it can’t distinguish from browsers.
During an active launch, the first thing worth watching each morning is Event Match Quality, not just spend or click-through rate. A quality drop usually shows up hours before a cost-per-result spike does, giving you a window to fix hashed parameters before the algorithm reacts to bad data.
Before any campaign goes live, run a fixed pre-launch sweep: confirm event_id deduplication is active, verify Purchase parameters against a real test transaction, and check for legacy pixels left by a previous ad manager.
The Fastest Path to Reliable Tracking
If you’re setting this up under time pressure, which most creator launches are, start with the partner integration if your platform offers one. It removes the most common sources of error: mismatched pixel IDs, missing parameters, and manual code that goes stale after the next theme update.
Enable Conversions API from the same screen if your platform supports it, and confirm deduplication is active before you consider the job done. Don’t treat every event as equally urgent. Get Purchase and Lead rock solid first, since those are what your ad account actually optimizes toward; ViewContent and AddToCart matter, but they’re secondary.
When something looks off, and something usually does the first time, stage it in Test Events before you send real traffic at it. A few minutes checking parameters in a sandbox beats discovering a broken Purchase event three days into a launch with money already spent.
— Money
Let Money-plug Handle Your Pixel and Launch Tracking
Money-plug is the alternative to piecing together your own tracking stack for a launch, especially when a ten-day sales window doesn’t leave time to debug a broken CAPI connection mid-campaign. Rather than hiring a freelancer for setup and hoping the deduplication holds, creators working with Money-plug get pixel and Conversions API implementation built directly into the launch itself, alongside the audience research, sales copy, and paid ad management that drive traffic to it in the first place.
That means the same team watching your Event Match Quality and event parameters is the team running your ad spend, so a tracking problem gets caught by the person who’d actually feel it in the numbers, not flagged in a support ticket days later. The agency works on a pure revenue-share basis, meaning there’s no upfront cost to get a launch’s tracking and campaign infrastructure built correctly from day one.
If you’re planning a launch and want the tracking handled alongside everything else, from product positioning to the ad campaign itself, visit Money Plug Lab to see how the process works for creators in your position.
Sources
For the setup steps covered here, Meta’s own Events Manager and Conversions API documentation remains the primary reference and gets updated as platform requirements shift. If you’re on Shopify, the platform’s pixel and ad integration guide covers partner-specific setup steps not repeated here. HubSpot’s external ad network installation guide is worth a read for its privacy-law notes. And if your campaigns run through display networks rather than social platforms, Google’s guide to impression pixels and click trackers covers that separate but related setup.
- Set up and install the Meta Pixel | Meta Business Help Center
- Meta Pixel: Setup Guide for Facebook Ads (2026) - Shopify